
The Notification Center page lets admin users and users with the appropriate permission manage BEACON event notifications. Notifications are sent at the date and time an event starts. Users can create new and edit existing notifications and:
- Specify email or SMS text message delivery.
- Select any events defined on the Events>Catalog page to receive notifications for.
- Choose to receive up to 20 such notifications per type of event daily.
In addition, notification history on a per recipient and all recipient basis can be viewed and exported. History details include the event name, date the event occurred, the notification status, and who received the notification.

Use the Notification Center search box on the left to quickly locate a Notification by entering an email address, phone number, recipient name, or an event name.
![]()
Use the Pagination controls on the lower right side of the screen to step forward and backward, jump to a specific page, and change the number of records displayed per page.

To create or edit a notification,
- Do one of the following:
• Click +Add Notification to create a new notification.
• Find a recipient of interest, click the three dots on the right side of the screen, and select Edit from the menu.

- Use the Delivery Method drop-down menu and select one of: Email or Text Message.

- Enter one of:
• The recipient’s full name and email address in the corresponding fields.
• The recipient’s phone number.NOTE: SMS text messages require users to opt-in. If a user chooses to opt-out, no messages will be sent to that user. Also, opt-in messages never expire.
- Click +Add Recipient and repeat steps 1-3 as many times as needed to subscribe more users to the notification.

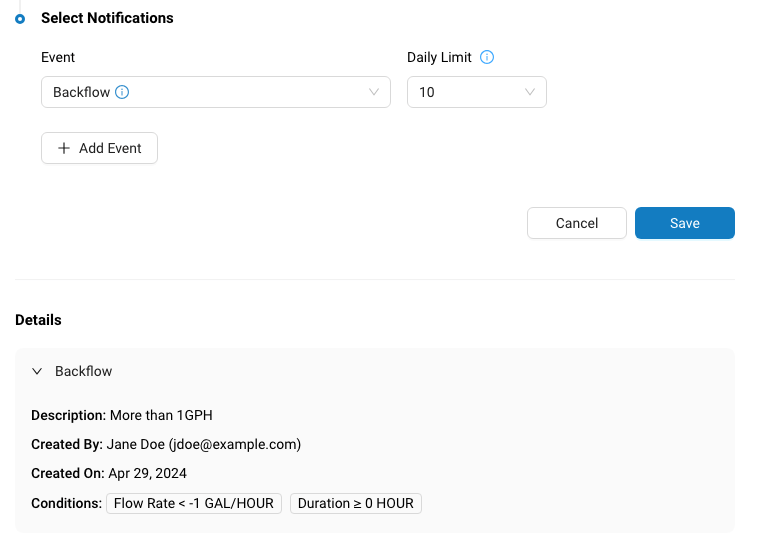
- In the Select Notifications section, use the Event drop-down menu to select an event of interest.

- Use the Daily Limit drop-down menu to set the maximum number of notifications that the system will send daily.
- Click +Add Event and repeat steps 5 and 6 as many times as needed.
- Click Save when you are finished. Click Cancel to exist.
- In the Details section, click > to see information about the selected events.


View Notification History
To get a list of previously sent notifications:
- Find a recipient of interest, click the three dots on the right side of the screen, and select Edit from the menu.

Notice the name of the event, the date of the notification, the notification status and the user the notification was sent to are displayed. - If desired, use the Event drop-down menu labelled All Events (the default) to select an event.

- Use the time-frame drop-down menu labelled Last 7 Days (the default) to specify a date range.

- Click the Export button to open the Export drawer for the corresponding Notification recipient.Notice the Overview section of the Export page displays statistics and information about the content of the file being exported.

- By default, all of the available fields are selected. To export a different set of fields, uncheck fields you want to remove from the export.Alternately, the Select Fields drop-down menu lets you Deselect All fields so that you can then check the boxes next to the fields you want to export.

TIP : The order that you check the fields determines the order that the fields appear in the file. In this example, the user checked Title, Recipient Address, and Notification Type in that order.

- Click Export to start the export process. A progress bar lets you watch as the system processes your request and when the export is complete displays this message:

- Click Download to retrieve the file.
- Click the History tab link in the second sentence above the Download button or click the History Tab to view all your exports.


For tips on getting the most out of you notifications, see Event Notification Best Practices.
Export all Notification History
To return a single record containing all Notifications and their recipients, click the Export button located under the User Profile section in the upper right portion of the screen.

Repeat Steps 2 – 8.


