
The Billing Reads page lets you manage billing reads and create field assignments.
Like the At a Glance page Billing Reads module, the Billing Reads page processes read data captured by networked and manually read meters to create billing read files that can be passed to your billing system.
More importantly, the Billing Reads page allows you to validate billing reads by reviewing and accepting or flagging reads that appear unexpectedly high or low. If a read seems inaccurate, users with the appropriate permissions can request a meter re-read by creating a new field assignment.
ORION Mobile Read (OMR v3) users can now make field assignments directly from the Billing Reads page, bypassing the earlier method of creating assignments from the Monitor page.
The process for creating assignments has also been updated. Previously, you would select a route and cycle, create a billing read assignment from the Monitor page, and then generate a billing read file to send to the utility billing system. Now, the process begins with creating the billing read file or files.
Additionally, the process for creating the billing read file varies depending on whether you use “default” or “configured” exports. “Default exports” refers to billing read files that are set to export in CSV format, while “configured exports” means the files are exported in formatC (flat file)/FormatD (csv)/FormatV (MVRS).
Getting Started – For Default Export (CSV file) Exports
If your billing read files are in CSV format and you need to assign billing read field tasks to multiple mobile readers, do the following:
- Click Get Billing Reads to open the Get Billing Reads drawer.

By default, the Billing Read Date is set to “today” and the Read Time Tolerance is set to three days.
NOTE: Read Time Tolerance determines the number of days from the Billing Read Date that the system looks back for a valid billing read. - Set a Billing Read Date that ensures all of the required billing reads have finished being entered into the system from your mobile reading devices.TIP: Choose a Billing Read Date as far as five days in the future for best results.
- Set a Read Time Tolerance that matches your billing cadence. That is, if you bill every 30 days, set a tolerance of 30. If you bill every 60 days, set a tolerance of 60, etc.The Billing Read Date and Read Time Tolerance settings get applied when you click Get Billing Read in Step 5 below.
- Use the Saved Filters drop-down menu to select a filter that includes the meters, billing cycle, or route that you want to retrieve billing reads for. (For details on how to create Saved Filters, see Saved Filters.)

After it’s selected, the filter gets displayed under the drop-down menu. Only one saved filter can be selected at a time.

- Click Get Billing Reads. Notice that horizontal progress bar displays the import’s progress as the file uploads.

- When the upload completes, it will be added to a paginated list that opens automatically.

The list lets you quickly see the history of your billing read file activity. In addition, you can:• Use the All Time drop-down menu to sort records based on the time they were created.

• Use the Status drop-down menu to filter results based on the status of the billing read file.

• Click the plus sign (+) next to a file name to get an expanded view of the export details.

• Use the Status drop-down on the right side of each entry in the list to change that file’s status.

• Hover your cursor over the icon next to the file name is see which saved filter was used to generate the billing read export. In the example below, the saved filter was named “Badger.”

• Click the file name link to open the Billing Read Validation page (see below for details).


Getting Started – For Configured Export (FormatC) Users
If your billing read files use formatC and you need to assign billing read field tasks to multiple mobile readers, begin by navigating to the Billing Reads module on the At a Glance page.
- Click Get Billing Reads.

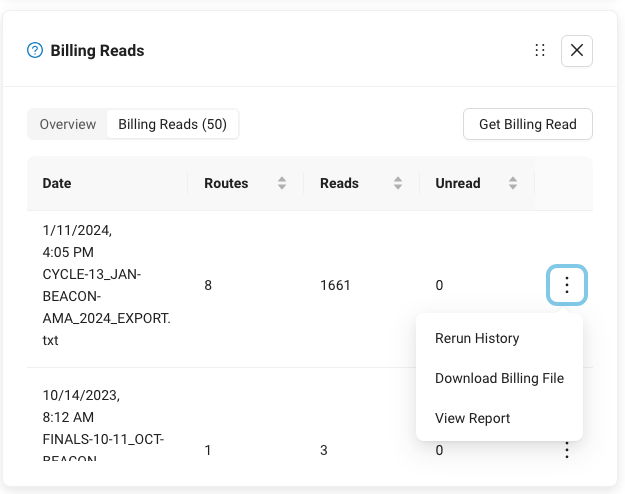
- Find the billing file of interest from the list (click-drag the vertical scroll bar on the right side of the module if needed), click the three vertical dot icon (highlighted in blue in the image below) and select Download Billing Read File to save the file to your computer.

- Repeat Step 2 as needed until you have saved all the files used during your previous billing period.
- Use the vertical navigation section on the right and open the Billing Reads page.

When first accessed, theBilling Reads page displays a blank table.

- Click Get Billing Reads to open the Get Billing Reads drawer.

- By default, the Billing Read Date is set to “today” and the Read Time Tolerance is set to three days.
NOTE: Read Time Tolerance determines the number of days from the Billing Read Date that the system looks back for a valid billing read.Choose a Billing Read Date that ensures all of the required billing reads have finished being entered into the system from your mobile reading devices.TIP: Choose a Billing Read Date as far as five days in the future for best results.Set a Read Time Tolerance that matches your billing cadence. That is, if you bill every 30 days, set a tolerance of 30. If you bill every 60 days, set a tolerance of 60, etc.The Billing Read Date and Read Time Tolerance settings get applied when you click Get Billing Read in Step 8 below. - Click within the upload zone to navigate to the billing read file you downloaded in Step 2 or drag and drop the billing read file onto the upload zone (the dotted-blue line in the examples).Notice the file appears at the bottom of the zone. This tells you the file has been successfully loaded. Only one file can be uploaded at a time.

- Click Get Billing Read. Notice that horizontal progress bar displays the import’s progress as the file uploads.

- When the upload completes, it will be added to a paginated list.

- The list lets you quickly see the history of your billing read file activity. In addition, you can:• Use the All Time drop-down menu to sort records based on the time they were created.
• Use the Status drop-down menu to filter results based on the status of the billing read file.
• Click the plus sign (+) next to a file name to get an expanded view of the export details.

• Use the Status drop-down on the right side of each entry in the list to change that file’s status.
• Click the file name link to open the Billing Read Validation page (see below for details).


Billing Read Validation
The Billing Read Validation page lets you to review, approve, and reject individual billing reads based on various criteria, such as whether the read value falls outside of an expected high/low range or if an exception occurred that prevented a valid read from being obtained. Reads that seem inaccurate can be flagged and sent back for re-reading via a new field assignment, ensuring accuracy before final approval.

The Search bar on the left lets you find individual accounts and meters. The search function looks ahead as you type, so for example, typing 234 returns all of the IDs that contain 234.
A default set of filters gets applied to every billing read file. You can see those filters in the upper left corner of the page. Use the drop-down menu to see the defaults along with any filters you choose to add. More on adding filters below.

| Filter | Function |
| High Reads | Looks for reads the exceed the High Read threshold, which is set on a per-meter basis by passing values in the High_Read_Limit field of a Data Exchange file. |
| Low Reads | Looks for reads the fall below the Low Read threshold, which is set on a per-meter basis by passing values in the Low_Read_Limit field of a Data Exchange file. |
| Pending Reads | Detects reads that have been assigned for collection |
| Endpoint Tamper | Detects reads that are reporting tampers. |
| Encoder Error | Detects reads that are reporting encoder error. |
| Missed Read | Detects reads that were not collected or missed during mobile reading. |
| No Read | Detects reads that were collected during mobile reading that returned no actual read. |
The default filter set lets you automatically scan the billing reads file as it is being processed. During this scan the system looks for each condition, tags affected reads, and returns the affected reads in a paginated list that appears under the Stats section.
In the example below, a single read that matched the No Reads filter has been returned.

Click the plus sign (+) (circled in red above) to get more detail about the affected read.
To apply additional logic to detect other conditions within your billing reads file, click +
Add Filter.
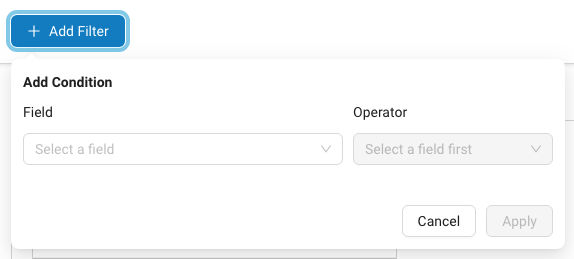
Use the Field drop-down menu to select a field to which you want to apply an operator.

TIP: Scroll to see all of the available fields.Use the Operator drop-down menu to apply logic to the selected field.

Different operators are available based on whether you select a text, number, or date field.
Operators for Fields that contain Numbers and Fields that contain Dates
| Operator | Function |
| Exists | Use this operator to filter for the existence of a field when a large set of exceptions and events. |
| Does Not Exist | Use this operator to find instances that do not match an existing condition. |
| Is Between | The value falls between two values. |
| Is Not Between | The value does not fall between two values. |
| Less Than | The value is less than the provided value. |
| Greater Than | The value is greater than the provided value. |
| Less Than Or Equal | The value matches or is less than the provided value. |
| Greater Than Or Equal | The value matches or is greater than the provided value. |
Operators for Fields that Contain Text
| Is One Of | The value matches one of the values provided. |
| Is Not One Of | The value does not match one of the values provided. |
| Exists | Use this operator to find an existing condition when searching a large set of exceptions and events. |
| Does Not Exist | Use this operator to find instances that do not match an existing condition. |
File Statistics
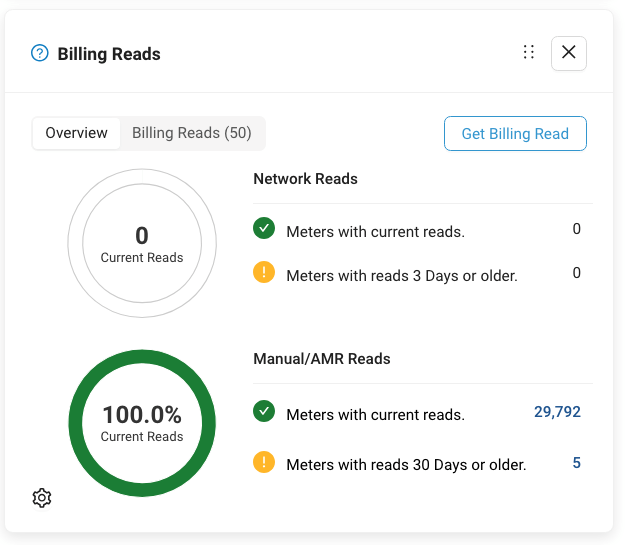
The upper portion of the Billing Reads Validation page gives you vital details about each billing read file.

In the example above, notice that box on the left lets you quickly see the Billing Read Date, the Date Tolerance setting, who created the billing file, who reviewed and if appropriate edited (approved/rejected reads), how many meters are included in the file, and the number of meters with reads.
The circular chart in the center of the screen displays the total number of services in the file. In this example, 243 (shown in green) of 244 services had good reads and one (shown in pink) service had no read.
The table on the right provides a text-based version of the center chart. The number of good reads – reads approved for billing – are reported in the Resolved Reads section. Reads with issues – exceptions, missing reads, no read, etc. fall under the Unresolved Reads header.
Accept Reads or Request Re-Reads
Use the list under the Stats section to review individual reads by doing the following for each read in the list that you wish to manually validate:
- Click the plus sign (+) next to the read of interest.

- View details about that read.

- Notice the two buttons to the right of the read details.

Click Accept to approve the read and include it in the billing file.
Click Re-read to reject the read. This action adds the service to a field assignment. - Repeat steps 1-3 until you have reviewed all of the reads.
- Click Create Field Assignments in the upper right corner to open the Create Field Assignments menu.

- Use the Type drop-down menu to select one of three job types:
- Collect Current Read – tells the reader to extract the latest read from the endpoint or meter.
- Collect Extended Status – tells the reader to Collect the Current Read and extract Extended Status messages from the selected endpoint(s). Extended Status messages include Endpoint Tamper, Encoder Communication Error, Encoder Removed, Endpoint Low Battery, Endpoint Programmed, Endpoint Magnetic Tamper, Meter Exceeding Max Flow and Meter/Endpoint Programmed.
- Collect Firmware Version – tells the reader to extract the current firmware version of the selected endpoint(s).Note: When using ORION Mobile Read, send each assignment type separately.
- Use the Order By drop-down menu to select the desired read order.

- Click Create to complete the assignment. Click Cancel to exit and close the Create Field Assignment menu.


Customize Billing Read Files
The Fields menu, located vertically on the right side of the list of billing read files lets you add or remove fields as needed from the current billing read file.
To toggle fields on and off, do the following:
- Click the Fields link.
 This opens a menu that includes the available fields.
 - Check and uncheck the box next to fields you want to include or exclude in your billing file.

In the example above, the default billing read fields are checked.
- When finished, click the Fields link to close the Fields menu.

Navigation
Pagination controls at the bottom of the page let you:
- See the number of reads that match the conditions specified by filters in the horizontal tool bar at the upper left.
- Step forward and backward through the pages.
- Select the number of reads displayed per page.


